The Infinite Audio Book
- Ben Lampere
- Jul 15, 2024
- 6 min read
I had this seemingly dumb idea. Most such ideas are fleeting, and you don't act on them. But this one was different. What if your life were a movie? What would it be about? What would happen in it? That's where my idea began. With the rise of AI, I wanted to see if AI could narrate my life in real-time.
OpenAI offers a bunch of services, including image recognition, large language models, and text-to-speech. For this project, I planned to use all of them. The idea was to have a camera take a picture, get a description of that picture, ask ChatGPT to write a narrative scene based on what it saw, convert that text to speech, and play the audio.
This project had to be portable, so I needed a device with a small form factor. I chose a Raspberry Pi Zero with a Pi camera and a Pi Sugar 3 battery. The Pi Zero is lightweight, has a camera module, and enough power for this project. The only downside is the lack of an audio jack, so I used wireless earbuds instead. For the battery, the Pi Sugar 3 was perfect, adding only about an inch to the depth. Here are the links to all the necessary hardware.
To get it to work you will also need:
Monitor with micro HDMI cable: to see the screen and configure your Raspberry Pi Zero
Mouse/Keyboard: to interact with your Raspberry Pi zero for configuration
USB micro to female A: Because the Raspberry Pi Zero only has a USB micro
SD Card: for load up the Raspberry Pi OS
Wireless Headphones: Raspberry Pi Zero doesn't have an audio jack
To make this look nice, I designed a 3D case, modifying an existing one I found online to fit the battery. The final design looked like this. I printed it with a Bambu P1S, which took about an hour. While I'm not great with complex designs, this case turned out alright but could still use some improvements.

Credit to Adafruit for the original case:
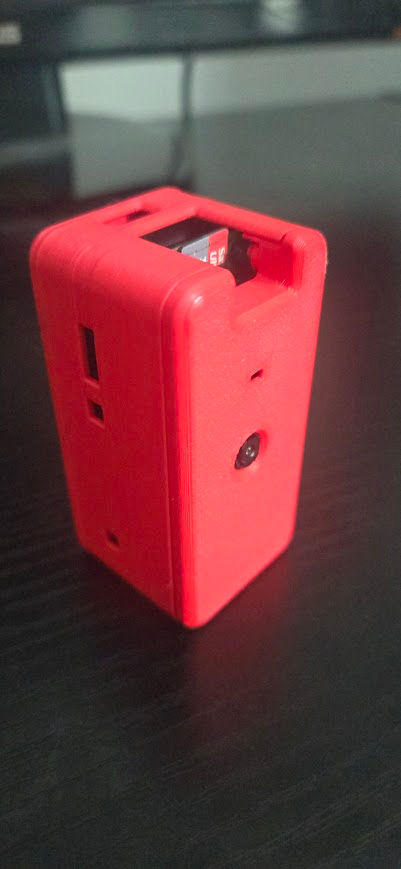
My Modified case can be found here
Now that the hardware is set up, let's go over the OpenAI API. First, you need to create an account. I'll assume you're one of the 150+ million people who already have one. If not, head over to openai.com. Since this requires some API calls, it costs a little money. I do mean a little, as I've been working off the same $10 dollars I initially put in for this project. You can add a balance using the link below. Feel free to start with as little as $5 dollars just to get the hang of it.
After that generate an API key so we can use it in our code. Be sure to save it, it will only show once.
We are finally ready to give this idea some brains, let's began writing some code. Since many example codes were written in Python, I chose to use the same language. To simplify things, I'll break it down step-by-step.
First, we import the necessary libraries, which you'll understand as we go along. We initiate the OpenAI library and retrieve the OPENAI_API_KEY from the environment variables.
Protip: to add an environment variable, run the following function.
In a terminal run
nano ~/.bashrc2. add you API key at the end of the file
export OPENAPI=your_value_here3. save the file
4. apply the change
source ~/.bashrcNext, we define image_path, which is simply the location where we want to save the temporary file of the photo taken by the camera. Here, we name it as a placeholder. Then, we define a string for the base64-encoded image that will be sent to OpenAI. Lastly, we create two JSON objects. The first one defines the headers, indicating that we are sending JSON and providing the API key so OpenAI can charge us for the call.
The payload specifies that we want to use the vision API. We include the image's base64 encoding and a prompt asking OpenAI to describe what is in the photo. For optimal performance, we request a brief description.
from pathlib import Path
from openai import OpenAI
import requests
import os
import cv2
import base64
import time
import pygame

# OpenAI API key
client = OpenAI()

# OpenAI API Key
api_key = os.environ.get("OPENAI_API_KEY")
# Path to your image
image_path = "vision.jpg"

# Getting the base64 string
base64_image = "error"

headers = {
  "Content-Type": "application/json",
  "Authorization": f"Bearer {api_key}"
}

payload = {
  "model": "gpt-4-vision-preview",
  "messages": [
    {
      "role": "user",
      "content": [
        {
          "type": "text",
          "text": "What’s in this image, describe it in a short one sentence"
        },
        {
          "type": "image_url",
          "image_url": {
            "url": f"data:image/jpeg;base64,{base64_image}"
          }
        }
      ]
    }
  ],
  "max_tokens": 300
}
The following function handles taking the picture. We create a directory named webcam_photos and then start the camera. We capture the first frame and save it as webcam_photo.jpg. Finally, we return the filename.
def capture_webcam_photo(save_directory="webcam_photos"):
    # Create directory if it doesn't exist
    if not os.path.exists(save_directory):
        os.makedirs(save_directory)

    # Open default camera (usually the first camera)
    cap = cv2.VideoCapture(1)

    # Capture frame-by-frame
    ret, frame = cap.read()

    # Generate a unique filename
    filename = os.path.join(save_directory, "webcam_photo.jpg")

    # Save the captured frame as an image
    cv2.imwrite(filename, frame)

    # Release the capture
    cap.release()

    return filename
Once we have the filename which contains the path we encode the image and pass it into a base64 encoder and return that string.
# Function to encode the image
def encode_image(image_path):
  with open(image_path, "rb") as image_file:
    return base64.b64encode(image_file.read()).decode('utf-8')
At this point, we have received the image description from OpenAI. To customize the narration for you, we adjust the parameters: name, age, and location. We instruct OpenAI, using ChatGPT, to write a third-person narration that includes the information you provided. Finally, we return the response, which is the text of the narration.
def generate_response(prompt):
    name = "ENTER NAME HERE"
    age = "ENTER AGE HERE"
    location = "ENTER LOCATION HERE"
    response = client.chat.completions.create(
        model="gpt-3.5-turbo",
        messages=[
            {"role": "system",
             "content": "You're a narrator in a movie for a person named " + name + ". He/She is " + age + " years old an lives in " + location + ". When you get a descript of a scene you continue the narrative from the perspective as " + name + ". Everyone should be in 3rd person"},
            {"role": "user", "content": prompt}
        ]
    )
    return response.choices[0].message.content
Once we have the narration, we want to convert it to speech. We create a file called speech.mp3 and use the response from OpenAI to generate the audio of the narration text, which we save to the mp3 file.
def text_to_speech(text):
    speech_file_path = Path(__file__).parent / "speech.mp3"
    response = client.audio.speech.create(
      model="tts-1",
      voice="alloy",
      input=text
    )

    response.stream_to_file(speech_file_path)
    return speech_file_path
Finally, we play the mp3 file. This is done by starting the pygame library and loading in the mp3. Then we play it and set the playback speed.
def play_mp3(file_path):
    # Initialize Pygame
    pygame.init()

    try:
        # Initialize the mixer
        pygame.mixer.init()

        # Load the MP3 file
        pygame.mixer.music.load(file_path)

        # Play the MP3 file
        pygame.mixer.music.play()

        # Wait until the music finishes playing
        while pygame.mixer.music.get_busy():
            pygame.time.Clock().tick(10)  # Adjust the playback speed
    except pygame.error as e:
        print(f"Error playing MP3: {e}")
    finally:
        # Cleanup Pygame
        pygame.mixer.music.stop()
        pygame.mixer.quit()
        pygame.quit()
That's it. The main function assembles everything and waits 20 seconds before taking the next picture.
while True:
    start_time = time.time()
    saved_path = capture_webcam_photo()
    base64_image = encode_image(saved_path)
    payload["messages"][0]["content"][1]["image_url"]["url"] = "data:image/jpeg;base64," + base64_image
    response = requests.post("https://api.openai.com/v1/chat/completions", headers=headers, json=payload)
    jsonZ = response.json()
    response_text = generate_response(jsonZ["choices"][0]["message"]["content"])
    output_file = text_to_speech(response_text)
    play_mp3(output_file)
    # Calculate the time elapsed since the function started
    elapsed_time = time.time() - start_time

    # Wait for the remaining time until 20 seconds have passed
    remaining_time = max(0, 20 - int(elapsed_time))
    time.sleep(remaining_time)
GitHub Link: https://github.com/Sheepwiz/MovieLife/tree/main
Now that the code is written, we are ready to boot up the device. Insert an SD card with a fresh version of Raspberry Pi OS. The first thing you should do is connect to your mobile hotspot Wi-Fi so you can travel with your device. Next, connect the Bluetooth headphones. To ensure these connect every time you boot up the device, you can try the following steps. This is a bit of a pain point, so if you have a better idea, let me know.
We need to get the script onto the Raspberry Pi. The instructions are linked on the github page but I'll provide them here.
Move to directory that you want to place the script
cd /path/to/directory2. Git clone the script
3. Install all the requirements
pip3 install -r requirements.txt4. Finally run the script
python3 narrative.py5. Save the file to run on startup
sudo nano /home/pi/.bashrcOn the last line of the file.
echo Running at boot
sudo python /home/pi/sample.py
6. Save and reboot the device
Once the script launches on boot, it waits a few seconds. The camera takes a photo and sends it through the API, and shortly after, you start to hear the narrator come to life. Here is a video of it in action (due to audio issues, I pulled the file from the device and overlaid it on the video).
Hope you enjoyed this project as much as I have. Feel free to follow me for more projects and information on technology, technology, and life. Reach out on my socials for inquires.
Comments